Sunday, January 19, 2014

Asian Lettuce Wraps

Was at the store today and saw this great bibb lettuce and instantly thought "lettuce wraps". So I grabbed some ground pork and green onions. When I got home, I realized I didn't have any ginger...oops. Oh well. Looking around the internet, I found this recipe. It was a pretty good start - I didn't have tofu, but that's ok. I shredded up some carrots instead for some color. I used the sauce portion of the recipe - only I used chili-garlic sauce for heat instead of shriracha. I also did a quick pickle of grated radish - just add some vinegar while you are getting everything else ready and chopped peanuts. 


Very yummy but messy. The picked radish added some zing to the savory of the pork. Also this dish was very quick, so it's best to have everything in place before you start cooking. 

Sundried Tomato and Parmesan Cheese Bread

I'm really enjoying making bread. I found a cook book called Artisan Bread in 5 Minutes a Day. The idea is that there is only 5 minutes of active work time and the rest is rising or baking time. I've been working with the Master Recipe for now and plan to keep working through the book. There's another book with more whole grain recipes that I plan to get into sometime soon. I really like the way things are set up in this book - all the recipes are in volume but also measured in weight. What is also nice is that you make enough dough for a few loaves and it sits in the fridge, so it gets more of a sourdough flavor. And, there is no kneading!


Here's the dough. Another hallmark of this type of dough is that it is wetter than dough that you have to knead. This dough is about a week old. I also added some dried herbs to the flour when I first mixed the dough.


For this bread, you take your dough and roll it out like a pizza. Then spread some olive oil, chopped sundried tomatoes and grated parmesan cheese. Then roll it up like a jelly roll.


Now put the loaf in a pan to rise for 90 min.


After the 90 min, you notice that the bread doesn't rise much.


Bake in a 450 degree oven for 35 minutes. Another hallmark of this style of bread making is that you bake directly on a pizza stone and add steam. I don't have a pizza stone, so have been using the Dutch oven method I used when making my first bread. It works well, but I was making 2 loaves. This is why I put them in the loaf pans. You also put a pan in the oven to hold water to make steam. Eventually, I'll get a pizza stone, but for now what I'm doing is working, so why rock the boat?


Let the loaf cool completely and enjoy. Very tasty bread!! If you are interesting in the Master Recipe, let me know, or check out that cookbook, totally worth it!!

Sunday, January 12, 2014

Asian-Style Marinade

I'm a big fan of Asian flavors. Lately I've been making up a marinade that uses jam as a base. Sort of taking a riff off a marinade that uses apricot jam or orange marmalade as a base. I don't have that kind of jam on hand, but I had blackberry. The jam really is there to add sweetness. Then add your classic Asian flavors - ginger, garlic, soy, rice wine vinegar, sesame oil, chili garlic sauce, Chinese 5 Spice powder and chicken bullion (with water - you could also use chicken stock). 


I didn't measure my ingredients - I like to judge how much I need based on taste and how much chicken I'm going to cook. This batch is for me to eat through the week.


Before the oven. I like to somewhat poach my chicken so I use a lot of marinade.


These chicken breasts were huge, so they took almost an hour to cook at 375 degrees. Make sure you check the internal temperature and look for 165 degrees. These will make great topping for my salad this week. 

Tortellini Soup

I had a friend ask me for a recipe for soup or stew last week and this prompted me to look through my archive for ideas to send her. It was kinda nice, because I came across this recipe for Tortellini Soup. I had this recipe in the back of my mind when I was making the Chicken Enchilada Dip from last week and used the bones from my rotisserie chicken to make stock.


Gathering all my ingredients.


Look at that stock! Plus it's free, since I'm using bones from a chicken I bought for another dish. I cannot tell you how easy it is to make this. When I was making my dip, I put a stock pot next to me and all the bones went in as I was shredding my chicken. Then you add water, celery, onion, carrot, Italian seasoning, bay leaves, salt, peppercorns. Bring to a boil and let simmer for how ever long you have time for - an hour is enough but longer is better. Then you let cool and strain out the solids. I usually let refrigerate overnight and then I can skim off the fat that solidifies at the top. Much better tasting than the stock or broth that you buy from the store AND is cheaper AND you know what went into it. Ok, off my high horse now.


Here's the delicious soup - full flavor, lots of veggies, warming - great for a cold night. I used only baby bella mushrooms, since I couldn't find shitakis. Also I chopped the mushrooms up to about the same size of of the tortellini and added them to the initial veggie sweat. That actually made the dish faster to make, since I didn't have to boil the mushrooms for 20 minutes before adding the pasta. I also added kale since I had some that needed to be used.


And this makes a ton of soup! Invite your friends!

Sunday, January 5, 2014

Chicken Enchilada Dip

I've seen a lot of these paint and sip places pop up around the country (and the products of which posted on Facebook). A few months ago, one popped up here in Wilkes-Barre called Art n' Vino and I thought it would be a great place to have a birthday party, for me.

The basic concept of these places is that you bring some wine and snacks and you all paint the same picture, as directed by the artist. Since I scheduled the party, I got to choose the painting - and I chose Starry Night by Van Gogh - who happens to be one of my favorite painters.

I decided to bring a dip in the crock pot since it's been so cold and it can be snacked on easily. After looking at many options, I decided to do a Chicken Enchilada Dip from Taste of Home. The recipe was to be heated in the microwave, so I put it in the crock pot instead. I also added more chicken - the recipe called for 2 cups, I added a whole rotisserie chicken (about 4 cups). I also don't have packets of taco seasoning - I have a bottle of seasoning from Penzeys, so I was a little unsure of how much to add, so I added 3 T. I stirred everything together and set on low for an hour, to make sure the cheese melted. Once everything was heated and melted, I added the rest of my pack of cheese (about 1 cup) to the top and some scallion greens.


Here's the dip, at the studio (notice my paint in the background). It was very tasty and was like chicken enchiladas. I have to say that I feel a little guilty that I professed to limit my processed foods and I go and dump a can of condensed chicken soup in a dip, not even a week later. I guess "try" is the operative word here. The dip really was so good, that I might rework it to make it less processed in the future. There I feel better now.


Here's my finished painting! We had such a good time! If anyone in the area thinks this might be a good idea, please take a look at Art n' Vino. He has a calendar of classes on his website (link above) and I think it's very reasonable - $36 per class. He even has a loyalty club, how fun! I'm ready for another one, anyone wanna join??

Saturday, January 4, 2014

Chemex Coffee

Well it's cold out here in NEPA. Apparently the temps have not been this low since 2010 and Monday night this week is expected to break the record low - negative 3. Nice. Growing up in the mountains of Nevada, we have had some cold weather but not THIS cold. Today is actually sunny but still frigid. Perfect temp for some coffee. I've been brewing coffee using the Chemex brewer for a few months now and really like it. It's been described as a cross between a French Press and a pour over system.


Here's what the carafe looks like. This is a small version that brews 3 cups. I find that it makes the perfect amount for just me. This amount fits well in my big mug and that's all I need to get going for the day. This style has a pretty wooden collar to help protect your delicate fingers from the hot coffee. But it makes it difficult to clean, so I've taken it off by now and just use an oven mitt when I need to pour.


The other unique thing about the Chemex is the filter. They have a special filter that allows the water to flow through the grounds at the correct rate. I happened to buy the wrong size of filter (since every other size than the one I have uses this filter), I fold it in half and it fits in the carafe nicely.


You have to wet the filter for it to work correctly.


Then you open it and put in the top of the carafe. In general it is recommended that the side of the filter with the more sheets of paper, goes toward the spout.


Now time for the coffee. Fresh ground is best. It's recommended that you use about 10g per cup of coffee.


Now grind.

The size of the grind is important - too coarse, your end result is too weak; too fine, your coffee is mud.


Dump the grounds into your pre-whetted filter.


Now is the time for your water. I have this nifty kettle that can boil water to a certain temperature - 200 degrees is recommended for the Chemex. Another nice thing about this kettle is that it will keep the water at your specified temp for up to an hour. Very nice.


Now the first step is to wet the grounds with a small amount of water. This ensures you get the most out of the coffee.


What is interesting, is that you can tell if your coffee is fresh ground by seeing it foam.


Next fill the top with water and allow to filter through.


I find that the grinds rise to the top and get stuck, so I try to wash them down.


Like this.


Here's the coffee goodness.


What's also kinda nice is there is this bubble in the carafe that tells you when you have reached that 3 cups. I've become a great fan of this method for coffee. It's simple and tasty. There's something about the ritual of making it - it also doesn't really take that long to make. First thing I do is put the water on to boil. Then I usually do some dishes from the night before. Then I measure out my beans and grind them. By the time I get them in the filter, the water is ready (or has been and the kettle is keeping it warm). The coffee flavor is so good that I found I don't need any sweetener - just some half and half and I'm good. Hope I have made this sound so good that you will try it for yourself!

Wednesday, January 1, 2014

Homemade Bread

Happy New Year to everyone! Hard to believe I have been blogging now for almost a full year! My first post was on 1/9/13. Looking forward to many more posts in 2014. Going home, it was really nice to hear the feedback about the blog - so you are reading it, that's good to know!! Today, am sitting here watching the Rose Parade, one of my favorite parades of the year...more so than the Thanksgiving Day parade. To think that all the floats are covered only with natural materials! And, wow, a band from my hometown just walked by on my TV screen - good job McQueen Lancers from Reno, NV (not my high school, but a good one, nonetheless).

Of course with the new year, there comes New Year's Resolutions. Mine are usually the same - lost weight, get in shape, etc. Something I did start last year and will continue will be to be more mindful of where my food comes from, as well as limit, as much as possible, food that is processed or has unnecessary chemical additives. Of course, that means more cooking of raw ingredients!

I recently started reading a book called Cooked by Michael Pollan. It's very interesting - he has 4 main parts that go along with the 4 elements - fire, water, air and earth. In each he learns to cook using this element, so in fire he learned how to slow cook Southern barbecue and whole hogs, in water he learned to braise, in air he learned to make bread and in earth he learns about fermentation. I'm currently in the Air chapter. The way he describes making bread was so evocative that I just had to try it myself. He made his own sourdough starter, which can take a while to start up and I fully plan on doing this in in future, but after waking up out of a dead sleep in panic yesterday morning and not being able to get back to sleep, I remembered seeing a recipe that sounded similar to the one Michael was describing but used regular yeast. So at 5am I trooped down to the kitchen to see where I put my yeast. The interesting thing about bread is that you don't really need a lot of ingredients - yeast, salt, flour, water - the key is time. The thing that interested me about this kind of "artisan" bread is that there is a long fermentation time - 8-12 hours and even overnight. The recipe I used comes from The Kitchn and is called No-Knead Bread. The idea is that you allow the time for the yeast to break down the sugars in the flour and make gluten without kneading it to a pulp. The dough also has a lot of water in it so it is very sticky and would not be something easy to knead.

So I went to find my yeast and came across some that I had put in storage from when I lived in Tucson.


It's only 2 years past the expiration date...the recipe only called for 3/4 tsp and a packet has 2 1/4 tsp, so I added the whole package...you do what you can with what you have!


So first things first, add the flour (regular all purpose flour), yeast and salt in a bowl. You are supposed to stir this up before you add the water, but I forgot to do that. You also need to have warm water - about body temperature.


Incorporate the water until your dough is a sticky mass. Then cover with plastic and a towel and find a warm corner in your kitchen to park the bowl for the day. I put mine on top of the radiator. My kitchen tends to be on the cold side, so I thought that would be the best place. I was a little concerned that it might be too hot in that spot so took the temp (you want it to be about 70). I ended up putting a little insulation between the radiator and the bowl and that seemed to be the ticket.


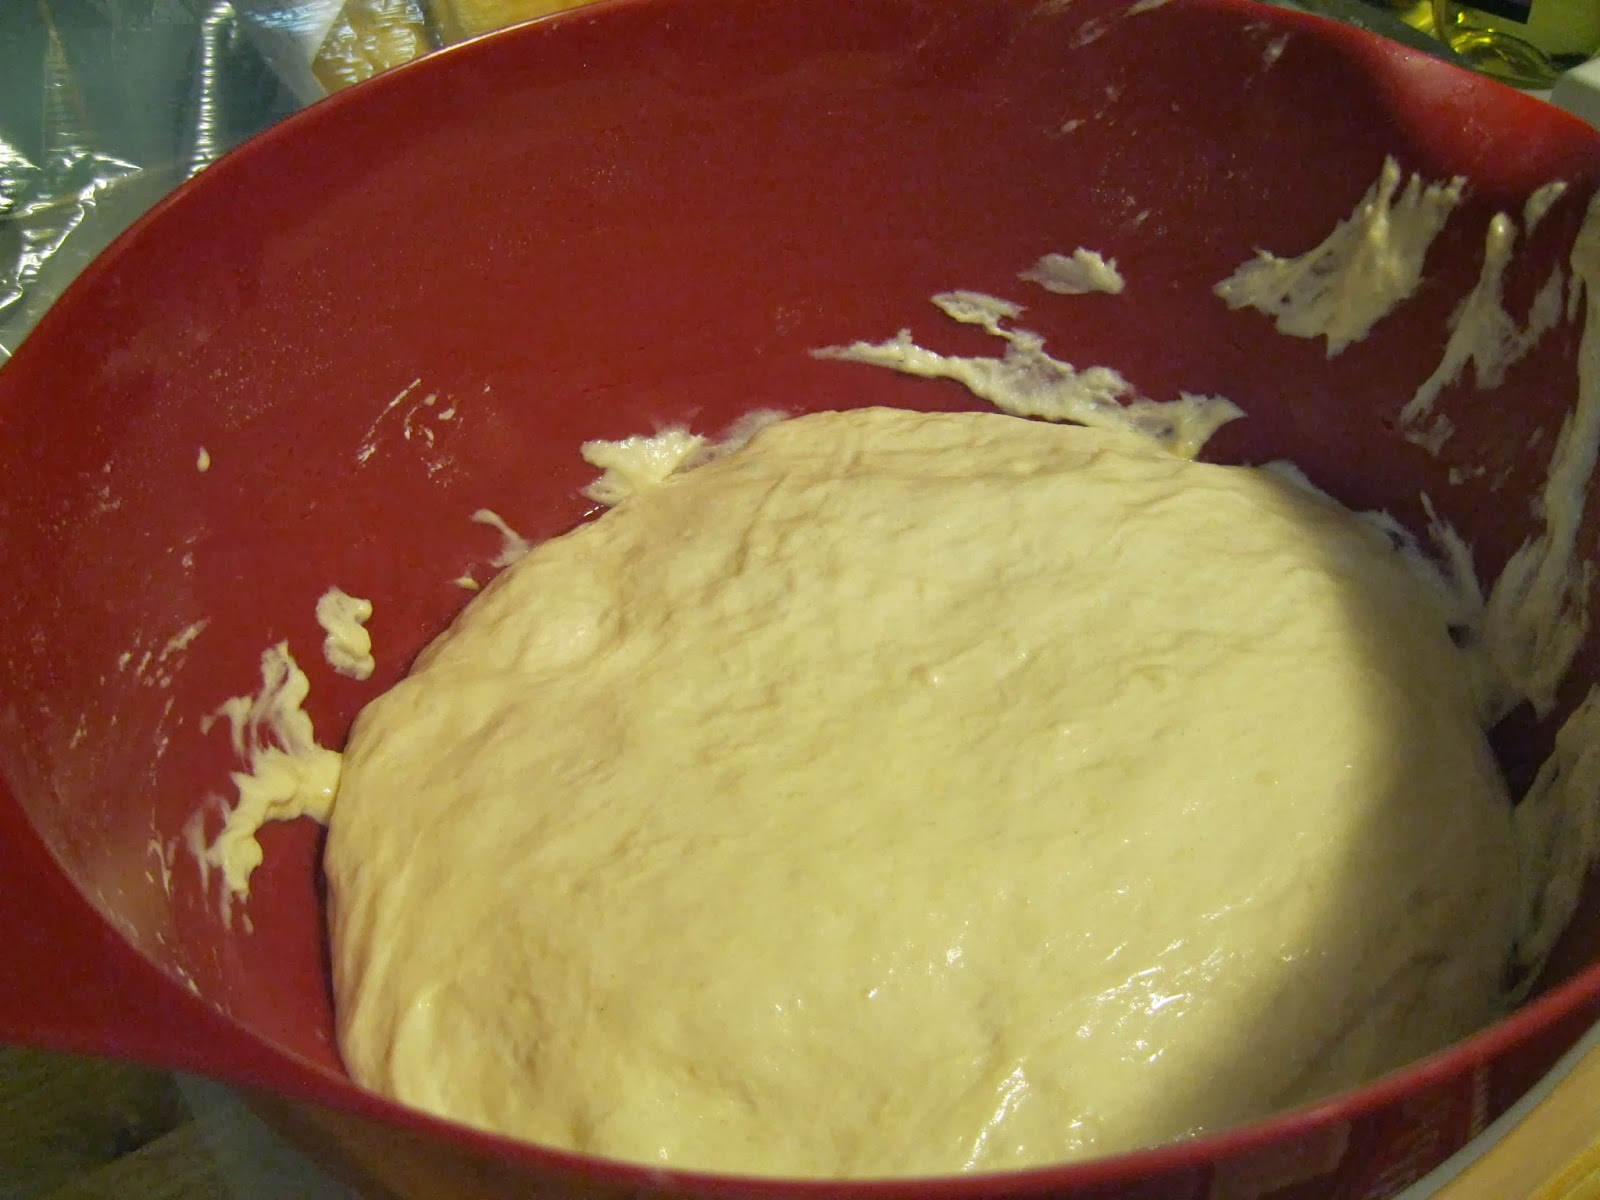
All day I was a little worried that the cats would investigate and I would end up with dough on my floor, but thankfully that worry was for nothing! This is what the dough looks like after fermenting for about 12 hours. You take the dough out of the bowl onto an oiled cutting board and fold it over, at least once. I didn't have such a great day so I kinda worked out my aggression on the dough.


Then put back in your bowl, cover with plastic and let rise again for 1 hour. When there is 20 min left of your hour, put a covered dutch oven in your cold oven and set to 450 degrees. Let both come up to temperature. Take dough and attempt to form into a ball (yeah, that didn't happen for me, but I tried) and put in the dutch oven, cover and cook for 30 min. Then uncover and cook an additional 15 min. You will know the bread is done with a thermometer at 220 degrees.


Look at that!! Pretty much fool proof - old yeast, didn't fully stir the salt in...


Of course I had a hard time letting the bread cool long enough before I had to try it. Look at that texture - Michael Pollan calls this a "crumb shot". By using the dutch oven, you are mimicking a commercial steam oven that allows for a nice crispy crust. It was very tasty bread, but you know, white bread. I think the texture was more interesting than the taste. Some of the comments at the end of the recipe alluded to this as well. I think the bread did as much as it could with the ingredients it had, but this has made me want to investigate a sourdough starter and whole wheat options.

Today, I decided to make a BLT panzanella salad with my bread. A panzanella is an Italian bread salad. This is a way to use stale bread as it softens up with the addition of salad dressing. I first looked to Alton Brown and his TBL Panzanella recipe for inspiration. His recipe is more tomato-centric (notice that the letters are changed around for this reason) and I didn't have that many. Another thing that I liked was that you use some of the bacon drippings to "fry" the bread. Of course, the recipe calls for bread that has been sitting out over night. I ended up putting my bread in a plastic bag (sacrilege, I know) but that actually softened the exterior some. I cooked my bacon in the oven, as described in this blog post. Then poured off the grease and used what was left to coat my bread cubes and put that in the oven - the oven was already hot and the pan was already dirty, why should I make more dishes for myself??


I added some Italian Seasoning and put it in a 350 degree oven for 10 min, stirring half way through. Then it was a matter of halving the cherry tomatoes, chopping up the bacon and adding the greens. I didn't use the dressing in Alton's recipe, though it would be good. I had some dressing on hand from a kale salad that I have been enjoying. This is a lemon forward, Caesar type dressing, super yummy.


Yum, yum, yum. Looking forward to a healthy, happy and tasty New Year.